

camunda Grails plugin - Reference Documentation
Authors: Martin Schimak
Version: 0.5.0
Table of Contents
1 Introduction
This plugin integrates the camunda BPM platform with the Grails web application framework. camunda BPM is a flexible framework for workflow and process automation. It's core is a native BPMN 2.0 process engine that runs inside the Java Virtual Machine. It is a perfect match for the Spring Framework - and therefore for Grails, too.Please check out camunda.org to get started with camunda BPM. Read on here to get started with the camunda Grails plugin!
2 Get Started
2.1 Install the plugin
In your BuildConfig.groovy configure the following plugin dependency:plugins {
compile ":camunda:0.5.0"
}grails refresh-dependencies
2.2 Create a process definition
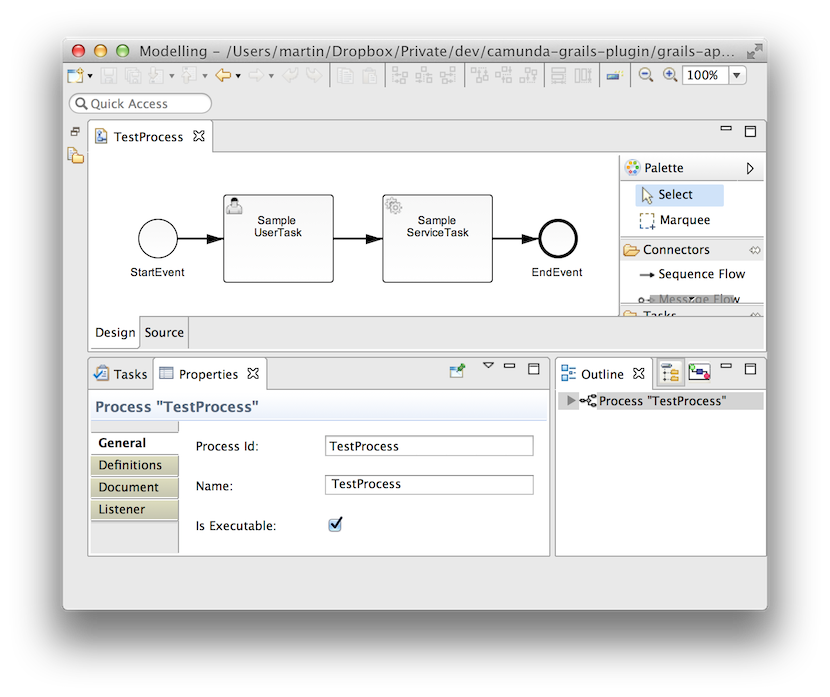
You can now create a BPMN 2.0 process definition by issueing the following command:grails create-process [name]
| Created file grails-app/processes/org/camunda/my/TestProcess.bpmn
| Created file test/integration/org/camunda/my/TestProcessSpec.groovy
 Furthermore you will find a 'spock' based integration spec executing and checking that process. It
does have a bit more content than your typical almost empty Grails spec template...
Furthermore you will find a 'spock' based integration spec executing and checking that process. It
does have a bit more content than your typical almost empty Grails spec template...[...] given: "a new instance of TestProcess" runtimeService.startProcessInstanceByKey("TestProcess")when: "completing the user task" def task = taskService.createTaskQuery().singleResult() taskService.complete(task.id)then: "the service method defined for the subsequent service task was called exactly once" 1 * sampleTestProcessService.serviceMethod(_ as Execution) [...]
2.3 Execute the integration test
Beware that this test will populate your test environment database with camunda related tables. By default, this will be a H2 in memory database preconfigured by Grails - so everything fine with that. For other databases, you will need to adapt the plugin configuration, too.
grails test-app integration: org.camunda.my.TestProcess
| Running 1 integration test… 1 of 1
| Completed 1 integration test, 0 failed in 0m 0s
| Tests PASSED - view reports in ./target/test-reports
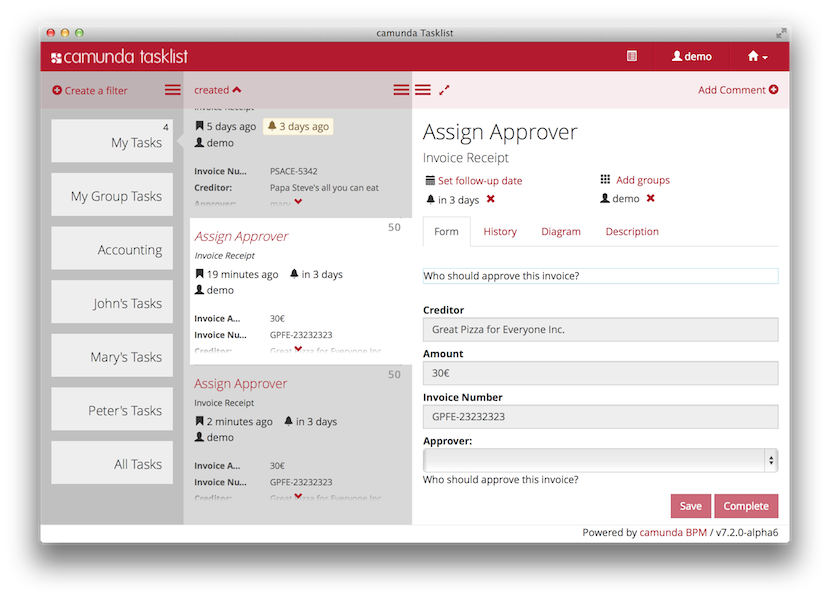
2.4 Wanna see camunda BPM in action?
Do you want to see the camunda BPM tasklist and cockpit web apps in action with your freshly created process? Then download a camunda BPM distribution for tomcat, expand the archive, go to the expanded folder and start it by issuing:./start-camunda.sh
grails war
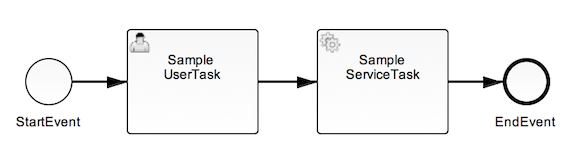
 The sample form shows you different types of fields. You must at least select one of the values
in the 'sampleRequiredSelectionField' in order to validate the start form and enable the
"Start"-Button. Start the process and you should see the "Sample UserTask" of your process
assigned to you as user "demo". You may want to check out the diagram pane of your process and then
complete the task via the form. This will execute the subsequent service task (which logs
the process variables provided by you into your tomcats logs/catalina.out file) and immediately
after that finish your process instance.
The sample form shows you different types of fields. You must at least select one of the values
in the 'sampleRequiredSelectionField' in order to validate the start form and enable the
"Start"-Button. Start the process and you should see the "Sample UserTask" of your process
assigned to you as user "demo". You may want to check out the diagram pane of your process and then
complete the task via the form. This will execute the subsequent service task (which logs
the process variables provided by you into your tomcats logs/catalina.out file) and immediately
after that finish your process instance.
3 A Word about Conventions
Grails uses convention over configuration to configure itself. This typically means that the names and locations of files are used instead of explicit configuration. Following this paradigm and the approach of other plugins like e.g. quartz or routing, the camunda plugin adds the "grails-app/processes" folder as soon as you create your first process via the create-process command:- your-project = top level project directory
- grails-app = standard grails layout directory
- processes = process definitions directory for *.bpmn resources
grails create-process org.camunda.my.Test
| Created file grails-app/processes/org/camunda/my/TestProcess.bpmn
| Created file test/integration/org/camunda/my/TestProcessSpec.groovy
<process id="TestProcess" name="TestProcess" isExecutable="true">
  …
</process>
Feel free to change the generated 'name' attribute to a better human readable version of the name!This 'id' attribute is needed when using the camunda API services, like e.g. starting a process instance by 'key' (which is referring to this id attribute):
runtimeService.startProcessInstanceByKey("TestProcess")4 User Guide
After having installed the plugin you can immediately start to use the camunda process engine.4.1 Create a process definition
You can create a BPMN 2.0 process definition by issueing the following command:grails create-process [name]
| Created file grails-app/processes/org/camunda/my/TestProcess.bpmn
| Created file test/integration/org/camunda/my/TestProcessSpec.groovy
Furthermore you will find a 'spock' based integration spec executing and checking that process. It
does have a bit more content than your typical almost empty Grails spec template...[...] given: "a new instance of TestProcess" runtimeService.startProcessInstanceByKey("TestProcess")when: "completing the user task" def task = taskService.createTaskQuery().singleResult() taskService.complete(task.id)then: "the service method defined for the subsequent service task was called exactly once" 1 * sampleTestProcessService.serviceMethod(_ as Execution) [...]
4.2 Inject camunda API Services
You can easily use the process engine internally in your application. Just inject the camunda process engine API services into your grails artifacts (like controllers, services, etc). The following services can be found in the package org.camunda.bpm.engine and are made available under their 'bean style' class names, as shown here in alphabetical order:import org.camunda.bpm.engine.*
…
AuthorizationService authorizationService
FormService formService
HistoryService historyService
IdentityService identityService
ManagementService managementService
RepositoryService repositoryService
RuntimeService runtimeService
TaskService taskService
CaseService caseService
FilterService filterServiceNote that many of these bean names are quite generic (like 'taskService', 'managementService' etc) and could easily clash with names you want to use in your application for other purposes - even more so when having in mind the Grails naming convention to use *Service as a name pattern for Grails services. On the other hand typical camunda users are used to the service names shown above and will expect to use these services via their established names. Therefore the plugin provides these services via those names shown above. However, in order to avoid potential name conflicts with grails services pre-existing in your project, the plugin also allows to change these default bean names via configuration.In addition to the camunda API services, the ProcessEngine itself can be used as an injectable dependency, too:
import org.camunda.bpm.engine.*
…
ProcessEngine processEngine4.3 Develop a camunda BPM tasklist application
Using the camunda BPM tasklist with 'embedded' forms as described in this section, will just work with a 'shared' process engine deployment scenario.
 With the help of the camunda Grails Plugin you can use grails gsp views to dynamically
render 'embedded' forms and hook them to the camunda BPM tasklist. You just need two things:
First, place your form into the views folder, like e.g. ...
With the help of the camunda Grails Plugin you can use grails gsp views to dynamically
render 'embedded' forms and hook them to the camunda BPM tasklist. You just need two things:
First, place your form into the views folder, like e.g. .../grails-app/views/test/sampleForm.gsp
<userTask id="UserTask_1" name="Sample UserTask" camunda:formKey="embedded:app:camunda/test/sampleForm"/><startEvent id="StartEvent_1" name="Sample StartEvent" camunda:formKey="embedded:app:camunda/test/sampleForm"/>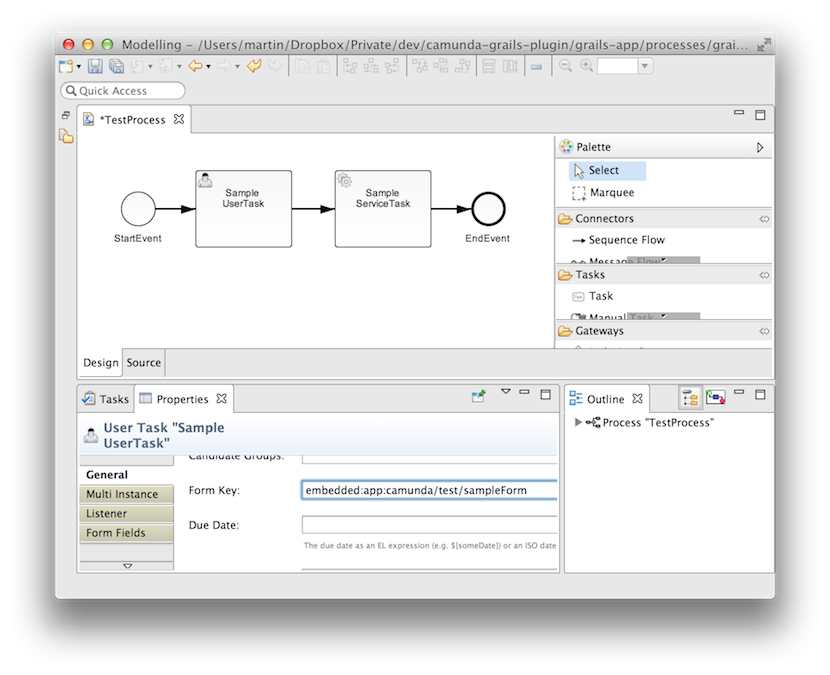 But what happens now behind the scenes at run time? First, when you start a process or open a task with
camunda BPM task list, it will realise that you want to use an 'embedded' form and that you want to
provide it via your grails web 'app' (from camunda's tasklist perspective you provide it from the
application, which deployed the process definition with that formKey). The tasklist will therefore
request the form from the absolute path '/your-grails-app-context/camunda/test/sampleForm'. The string
'camunda/test/sampleForm' is the string you provided in the formKey. camunda Grails Plugin will then
respond with the html body only of your 'test/sampleForm.gsp' and deliver it to the task list (by
means of a plugin provided grails controller named 'camunda').
But what happens now behind the scenes at run time? First, when you start a process or open a task with
camunda BPM task list, it will realise that you want to use an 'embedded' form and that you want to
provide it via your grails web 'app' (from camunda's tasklist perspective you provide it from the
application, which deployed the process definition with that formKey). The tasklist will therefore
request the form from the absolute path '/your-grails-app-context/camunda/test/sampleForm'. The string
'camunda/test/sampleForm' is the string you provided in the formKey. camunda Grails Plugin will then
respond with the html body only of your 'test/sampleForm.gsp' and deliver it to the task list (by
means of a plugin provided grails controller named 'camunda').Make sure that the body of your gsp just contains a single form element and that the html follows the conventions for camunda embedded forms. Of course you are free to dynamically generate that html via gsp mechanisms. To learn more about camunda embedded forms, you may want to look at the raw html code of the sample form provided with camunda Grails Plugin or consult camunda's embedded-task-forms docs.
4.4 Redirect camunda BPM tasklist to your own grails application
Of course, you are also free to use your own controller actions to deliver forms, be it for embedded purposes...camunda:formKey="embedded:app:forms/index"camunda:formKey="app:forms/index"taskId url parameter to look up the task as well
as with a callbackUrl parameter to redirect back to the task list.
5 Configuration Guide
It is not necessary to add configuration in order to get started. However, you will need some configuration to deploy to other environments than development and test. The plugin provides the possibility to adapt to your specific requirements by adding a new section 'camunda' to your Config.groovy (either top-level or beneath a specific environment):camunda {
…
}You will need such a configuration section to deploy to other environments than development and test. Find out more in the following two chapters.
5.1 Set the deployment scenario
You can set the deployment scenario for your process engine. The plugin currently supports the deployment scenarios- 'embedded' the process engine is embedded into your grails application and started and stopped with your grails application lifecycle
- 'shared': the process engine is shared, so preconfigured within and managed by your container
- 'none': the process engine configuration and startup is turned off
camunda {
  deployment.scenario = "embedded" // (or "shared", "none")
}
As long as you do not set this value explicitely, the plugin assumes for grails' environmentsThe moment you set the value explicitely, the plugin won't interfere with your decision. However,devandtestthe value 'embedded' to be the default scenario, *for all other environment the value 'shared'* (except if you have provided explicitcamunda.engine.configurationvalues for an embedded engine in which case 'embedded' remains default for other environments, too). The moment you set this value explicitely, the plugin of course won't interfere anymore!
Typically, you will want to use the 'shared' engine only for those grails environments which you use to prepare your container deployment war, e.g. 'production':Currently the plugin only supports tomcat as a container to look up a shared process engine. Download camunda BPM Tomcat distribution.environments { production { camunda { deployment { scenario = "shared" } } } }
null
5.2 Configure an 'embedded' process engine
5.2.1 Configure your process engine
You can fully control your embedded camunda process engine configuration via Config.groovy:camunda {
engine {
configuration {
…
}
}
}- your database is populated with camunda tables the first time the database is accessed
- any .bpmn (and for legacy reasons .bpmn20.xml) process definitions found in the classpath will be deployed to the database
- the job executor is turned on
This choice was made in order to make it as easy as possible to get started while relying on explicit configuration choices when deploying to other (and potentially production) databases.That means if you want to have that same behaviour for any other environment, you need to explicitely configure that in Config.groovy:
camunda {
  engine {
    configuration {
      databaseSchemaUpdate = true
      deploymentResources = ['classpath:/**/*.bpmn', 'classpath:/**/*.bpmn20.xml']
      jobExecutorActivate = true
    }
  }
}camunda {
engine {
configuration {
databaseSchemaUpdate = false
deploymentResources = []
jobExecutorActivate = false
}
}
}Please be aware that during integration test phase of any environment, two camunda configuration values are set by the plugin: the camunda job executor is turned off and service mocking is made available. Find more information about that in section testing.
5.2.2 Use primitive types, beans or any other object
For configuration, you can of course use primitive typed configuration values such as Strings and booleans, like e.g.camunda {
engine {
configuration {
processEngineName = "myCustomName"
databaseSchemaUpdate = false
}
}
}List<BpmnParseListener> parseHandlers = new ArrayList<BpmnParseListener>(); parseHandlers.add(new CustomParseHandler());camunda { engine { configuration { preParseListeners = parseHandlers } } }
camunda {
    engine {
        configuration {
            dataSource = "dataSource_camunda"
        }
    }
}
5.2.3 Use an alternative database
camunda's ORM mapping is provided by the mybatis mapping framework. Therefore the plugin can - and does by default - reuse your Grails 'dataSource' and 'transactionManager' beans, however it needs to be informed about a databaseType different from Grails default 'h2':camunda {
engine {
configuration {
databaseType = "postgres" // one of (as of writing): [h2, mysql, oracle, postgres, mssql, db2]
}
}
}dataSource {
dbCreate = "create-drop" // one of 'create', 'create-drop', 'update', 'validate', ''
url = "jdbc:h2:mem:devDb;MVCC=TRUE;LOCK_TIMEOUT=10000;DB_CLOSE_ON_EXIT=FALSE"
}
…
dataSource_camunda {
dbCreate = "create-drop" // one of 'create', 'create-drop', 'update', 'validate', ''
url = "jdbc:h2:mem:devDbCamunda;MVCC=TRUE;LOCK_TIMEOUT=10000;DB_CLOSE_ON_EXIT=FALSE"
}camunda {
engine {
configuration {
dataSource = "dataSource_camunda"
}
}
}5.3 Configure a 'shared' process engine
5.3.1 Provide a custom processes.xml file
When deploying to a 'shared' process engine container, camunda Grails Plugin will automatically add an emptyMETA-INF/processes.xml to your war file, in case you
do not provide your own.Please read about camunda's processes.xml to learn more about its configuration possibilities.If you want to provide your custom
processes.xml, just place it into your grails-app/processes folder like/grails-app/processes/META-INF/processes.xml
5.3.2 Provide a custom process application class
camunda Grails Plugin will automatically take care of registering a default process application class of typeorg.camunda.bpm.engine.spring.application.SpringServletProcessApplication
for you. So normally you don't need to do anything.However, for some reason, you may want to provide a custom process application class. Place this class
inside your grails application's /src/groovy or src/java folder and register it likeenvironments {
production {
camunda {
deployment {
scenario = "shared"
application = my.project.pkg.MyCustomSpringServletProcessApplication
}
}
}
}org.camunda.bpm.engine.spring.application.SpringServletProcessApplication)
or for all other types the plugin will register nothing and assume that you want your container to detect and
use that class. In that latter case don't forget to annotate it with org.camunda.bpm.application.ProcessApplication.
5.3.3 Configure and finetune dependencies provided by a camunda BPM container
When needing to prepare a war for a 'shared' process engine scenario, one needs to be aware that- the 'org.camunda.bpm:camunda-engine' dependencies are provided by the container
- the 'org.codehaus.groovy:groovy-all' library is provided by the container
environments {
  production {
    provided ("org.camunda.bpm:camunda-engine:$camundaVersion") {
      excludes 'spring-beans'
    }
  }
}camunda.deployment.shared.war.excludes = ['camunda-*.jar', 'groovy-all-*.jar'] camunda.deployment.shared.war.includes = ['camunda-engine-spring-*.jar']
5.4 Consider 'java.util.logging' settings
camunda uses java.util.logging. Therefore you need to make a conscious choice about whether to turn on/off the 'grails.logging.jul.usebridge' setting in your Config.groovy. See the information about the performance impact on http://www.slf4j.org.In case the bridge is not turned off explicitely by you, the plugin will turn it on for all Grails test phases. However, your explicit choice won't be overridden.This decision in particular makes sure that the bridge is turned on for tests executed in the default Grails environment 'test', for which no explicit setting is made in the default grails application. As soon as you make an explicit decision for any of your default or custom environments, the plugin won't interfere anymore.
5.5 Use an alternative version of camunda
Currently the plugin comes bundled with a dependency to the release 7.3.0 of camunda BPM. However you may want to choose another version. You then have to explicitely override the needed dependencies in your BuildConfig.groovy:dependencies {
compile ("org.camunda.bpm:camunda-engine:$camundaVersion") {
excludes 'spring-beans'
}
runtime ("org.camunda.bpm:camunda-engine-spring:$camundaVersion") {
excludes 'spring-context', 'spring-jdbc', 'spring-orm'
}
}repositories {
mavenRepo "https://app.camunda.com/nexus/content/groups/public"
}5.6 Provide alternative bean names
Many of camunda's API service names are quite generic (like 'taskService', 'managementService' etc) and could easily clash with names you want to use in your application for other purposes - even more so when having in mind the Grails naming convention to use *Service as a name pattern for Grails services. On the other hand typical camunda users are used to the established service names and will expect to use these services via their established names. Therefore the plugin provides these services via the established names. However, in order to avoid potential name conflicts with grails services pre-existing in your project, the plugin also allows to change these default bean names via configuration:camunda {
beans.runtimeService = 'myCamundaRuntimeService'
}def myCamundaRuntimeService
5.7 Override plugin configuration with custom beans
Of course, it is also possible to override some or all of the camunda spring beans defined by the plugin via the standard Grails way: by editing 'grails-app/conf/spring/resources.groovy'. In order to do that properly it is useful to know that the plugin registers all beans following the name convention camunda[DefaultAlias]Bean, e.g. the 'processEngine' is registered as bean 'camundaProcessEngineBean', then given either its default alias 'processEngine' (or its custom alias defined by the user).This decision was made partly in order to allow the configuration of alternative bean names, partly because some historic 2.3 versions of Grails display issues with custom spring beans named in potential "conflict" with the *Service name convention for Grails services.
5.8 Configure auto reloading of bpmn process definitions
You can automatically reload and redeploy '.bpmn' process definitions placed beneath 'grails-app/processes'. When changing the process definition while you are running your application with 'run-app', it will be redeployed to the process engine.You can turn this feature on/off explicitely:camunda {
deployment.autoreload = true // (or false)
}The autoreload feature is by default enabled for grails 'dev' and 'test' environments. For all other environments it is by default disabled.
6 Deployment Guide
Before deploying your application to a servlet container, you should make up your mind about a few things.6.1 Consider your deployment scenario
Does your application work with an 'embedded' or a 'shared' process engine?Do you either want to use the engine just behind the scenes of your own custom grails application with your own forms, controllers, services etc? Then go for the embedded engine. Or do you want to use the camunda BPM platform 'tasklist' with embedded forms and implement a grails based process application for it? Then go for the shared engine. In that case you will still want to use an embedded engine for testing your application.Now, configure your deployment scenario accordingly! Then move on with deploying your application according to your scenario.6.2 Scenario 'shared' process engine
(1) Download a camunda BPM Tomcat distribution. Make sure that the version of your camunda BPM container matches the version you use in your grails application. If necessary change the camunda BPM version used by the grails application.(2) Make sure you declared the shared engine for those grails environments with which you prepare your container deployment war, e.g. 'production':environments {
production {
camunda.deployment.scenario = "shared"
}
}You might want to check how to configure and finetune the dependencies provided by a camunda BPM container for a shared engine in greater detail.Finally, build your 'war' file ...
grails war
6.3 Scenario 'embedded' process engine
Download and start a vanilla servlet container, e.g. Tomcat. Furthermore, you will need to add some explicit configuration, as the plugin doesn't interfere with default camunda configuration values for production environments. To get started with a basic configuration for your embedded engine 'production' environment, this might look likeenvironments {
production {
camunda {
deployment.scenario = 'embedded'
engine {
configuration {
databaseSchemaUpdate = true
deploymentResources = ['classpath:/**/*.bpmn']
jobExecutorActivate = true
}
}
}
}
}grails war
7 Testing Guide
During the integration test phase of Grails (any environment), two configuration values are set by the plugin: the camunda job executor is *by default turned off* and service mocking is made available.Beware: you can explicitely turn on/off the job executor in your environment by configuration. In this case the plugin will not interfere with your explicit choice!In essence this behaviour makes sure that you can perform your tests
- in a single-threaded manner, fully controlled by your test code, and without having the job executor interfering from background threads.
- with the possibility to mock your service calls from within the process
7.1 Drive the process instances
For testing purposes, you can (and must!) explicitely "drive" your process whenever it arrives at a "wait state". Please review the discussion about transactions in processes to learn more about that. Such a wait state is always reached for e.g. user tasks, but with the job executor turned off in particular also for service tasks marked to be continued asynchronously:<serviceTask id="myServiceTask" … camunda:async="true"> … </serviceTask>
def job = managementService.createJobQuery().processInstanceId(pid).singleResult()
managementService.executeJob(job.id)
7.2 Mock the service calls
You can call services from within your process via JUEL expressions, like e.g.<serviceTask id="myServiceTask" camunda:expression="#{sampleTestProcessService.serviceMethod(execution)}" … > … </serviceTask>
def sampleTestProcessService = Mock(SampleService)
org.camunda.bpm.engine.test.mock.Mocks.register("sampleService", sampleTestProcessService)7.3 Auto reload and redeploy your bpmn process definitions
You can automatically reload and redeploy '.bpmn' process definitions placed beneath 'grails-app/processes'. When changing the process definition while you are running your application with 'run-app', it will be redeployed to the process engine.Also check the possibility to turn this feature on/off explicitely by configuration.8 Further Resources
8.1 camunda Grails plugin
8.2 camunda BPM
- User Guide
- Installation Guide
- BPMN 2.0 Implementation Reference
- Java API
- GitHub Repositories
- Issue Tracking
